Nutrientes brillantes
Student worthiness
Tried and trusted.
Contenido
Primary biological content area covered
Los escolares podrán observar como la flor transporta los nutrientes. Al ver como los nutrientes de una flor migran en el tallo y a través de las piezas de la flor los educandos conocerán las partes de la flor.
Materiales
Materiales del docente:
- Papelógrafo de la Flor
- Cortaplumas para cortar los tallos florales (como parte de los pasos siguientes)
Materials for Each Student Group:
- Flores- claveles anda bien. flores con sed anda mejor; deje las flores sin agua por lo menos una hr antes del experimento.
- flores sencillas para disección
- Colores para alimentos- al menos dos tonos ( rojo y azul)
- 6 large mason jars
- 6 little glass vials or pill jars
- Agua
- Tijeras
- Lupa
Palitos escarbadientes Construction Paper Lapices de color Cinta
Materials for Each Individual Student:
diagrama de la Flor (lámina 1) Diagrama de Observación (lámina 2) Lupas escarbadientes
Handouts
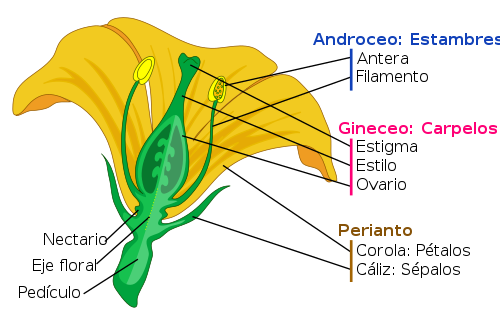
   Handout with diagram of flower and its parts.
   Click to see the full-size handout
   Each student will need a preprinted copy of the handout (Figure 1) prior to the lab.
   Observation Chart.
   Click to see the full-size handout
   Each student will need a preprinted copy of the handout (Figure 2) prior to the lab.
Descripción de la actividad
Students will learn about the parts of a flower and have the opportunity to observe how a flower receives its nutrients.
*Set up experiment
*Go over the parts of the flower- Use un papelografo de la flor Lámina 1
*Disección de la Flor
 *Explain process of transpiration
 *eriodically fill in time progress chart- Figure 2
Planificación de la lección
   Ask students what they already know about flowers
   For the experiment:
       Taking the flower cut off a piece of the stem at the bottom. Cut at about a 45 degree angle (the shorter the stem the faster color change will occur).
       Fill the glass vials with water then add several drops (around 10-15 drops work well) of one color of food coloring
       Place the cut flower into the colored water vial then place vial in mason jar (provides support)
       Observe what gradually happens to the white flower and have students periodically fill in their observation charts--About 30 minute intervals to record observations would work best.
       Pass out the flower handout and explain to students the various parts that make up a flower--A simplistic diagram with more basic parts than the one used so students will be able to recognize the different parts easier.
       As students wait for the flower to change have them disect a basic flower that will clearly show them the parts, using thier hands and toothpicks they will gently pull the flower apart and observe the various parts. They can use their flower parts handout to classify the parts of the flower they are noticing. They can take the parts they identify and tape them onto a piece of construction paper and label them.--One flower for a group of two or three students works well and reduces waste and clutter.
Potential pitfalls
   White Carnations may be unavaliable and color changes will not be as pronounced with carnations of other colors.
   The amount of food coloring used, it is good to have a high concentration of food coloring in the water.
   The amount of time it takes for the flower to send the nutrients up the stem in contrast to the amount of time students have to complete the experiment. We observed that the shorter the stem is cut the faster the nutrients reaches the petals.
   It might be difficult to keep track of observations in short time segments. Observations are a good idea, but time might need to be taken out of all parts of the day to make those observations because the reaction does not occur right away.
Transversales Matemáticas
Cree una tabla cronológica para seguir (monitorear) the speed at which the flower begins to absorb the nutrients (water) by observing how much of the flower begins to turn the color of the added food coloring. Students will fill in a "T" chart (Figure 2), writing the time of their observations and on the corresponding side illustrate what they observe changing in the flower. When all data is collected a class-wide line graph could be created to compare results.
Transversales con Artes
In creating their observation charts students will be observing the changes in the flower in close detail and will be drawing what they are observing in the second column of the chart. A variety of colored pencils will be avaliable for student use so they can make their observation as accurate as possible while expressing it artistically.
